Partner Document Delivery streamlines the loan origination process by allowing our mutual customers to deliver disclosures to Blend from the eFolder* in Encompass. By leveraging this integration, lenders can seamlessly deliver disclosures from Encompass to Blend and create post-submission loans in Blend directly from the Encompass UI. Additionally, if a loan does not exist in Blend by the time users need to deliver disclosures to a borrower, users will have the ability to use the Encompass interface to create a post-submission (follow-up only) loan in Blend.
*Partner Document Delivery relies on the use of the eFolder in Encompass Web. This eFolder is expected to be available as a configurable option within Encompass SmartClient in the Encompass 25.3 release.
**When testing / using Partner Document Delivery, please be advised that a loan must have either been created in Blend and synced to Encompass or pushed to Blend using our EPC workflow in order to send disclosures. If not, users will receive an error when attempting to send disclosures.
Setup for Partner Document Delivery
The following are action items that customers need to complete before Partner Document Delivery can be enabled in Blend.
Prerequisites
Before configuring this integration, customers must complete the following steps:
Reach out to Blend Support to obtain API credentials
These credentials are necessary for the integration to function correctly and need to be configured in your Encompass instance.
Establish a default Consumer Connect website to send disclosures via Partner Document Delivery*. Note: This is a technical requirement on the Encompass side to leverage Partner Document Delivery. Your Consumer Connect website will not be used for delivery of documents.
Access the Setting Up a New Encompass Consumer Connect Site guide from ICE Resource Center
Contact your ICE representative if you need assistance accessing this document
Complete at, a minimum, the following steps outlined in the document:
Task 2: Create and Name Your Site
End of Task 4: Publishing Your Site
Task 5: Assigning the Consumer Connect Site URL to Your Organization and Loan Officers
Submit a ticket to ICE and request a one-time passcode (OTP) to be enabled within Encompass*.
*Please contact your ICE representative for assistance with these steps.
Partner Connect Enablement
This section will describe how to add Blend as a partner in Partner Connect.
In order to configure this integration, users must have super admin persona access in Encompass and access to the Encompass Admin Portal.
To access the Encompass Admin Portal from Encompass Web, log in as a Super Administrator.
To access the Encompass Admin Portal from Encompass Desktop, log in as a Super Administrator, go to Encompass Settings, and click on Web Version Settings.
In the Admin section of Encompass, navigate to the Services Management page. Click on the “Add Service” button in the top right corner of the page.

A modal will appear that will allow the user to select a category. Choose “Document Preparation” from the dropdown, and then click the “Retrieve Products” button.

Locate the Blend tile, and click “Manual” to initiate manual setup.

On the “Edit Manual Setup” page, customers will need to provide a Service Setup Name (this should be “Blend” without quotation marks).
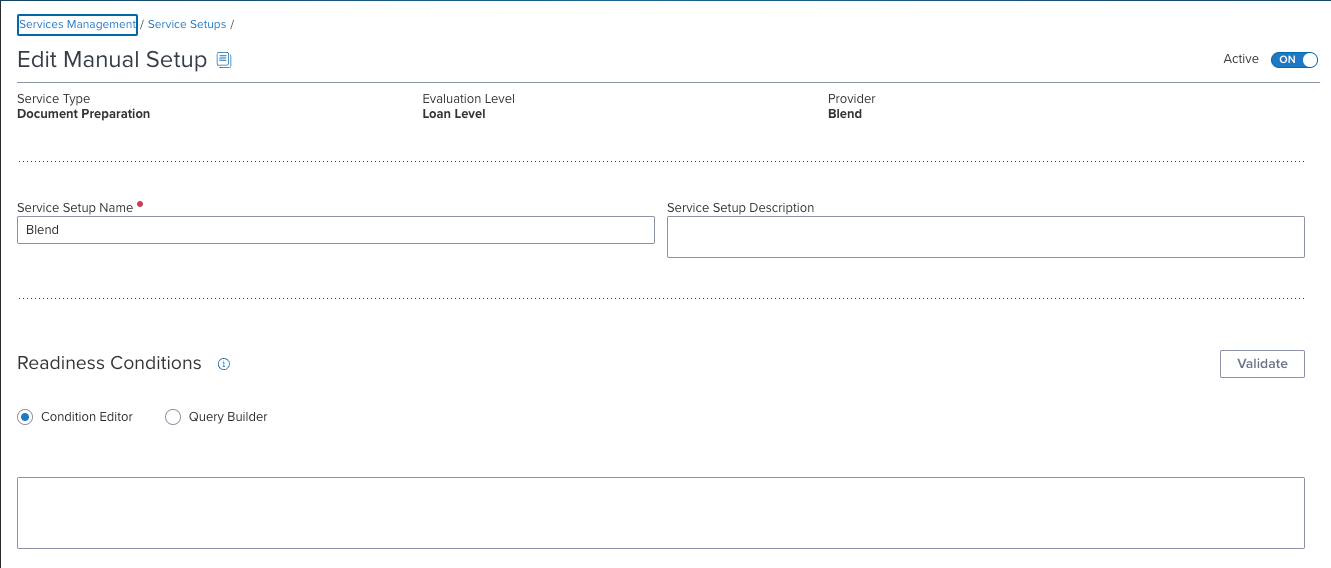
Note: The Readiness Conditions section does not apply to the Blend service and can be ignored at this time.
Customers must also ensure that appropriate organizations, personas and/or users have access to the Blend service by adding them to the Authorized Users section.

As a final step, customers should toggle the status to “ON” from the toggle in the top right corner of this page.

Configure API Credentials - Single Tenant
Customers must obtain API credentials from Blend, which will be used to configure a new service in Encompass. If you have not already done so, reach out to Blend Support or your Blend representative to receive API credentials for your tenant. These credentials are required in order to complete the remaining steps in this section.
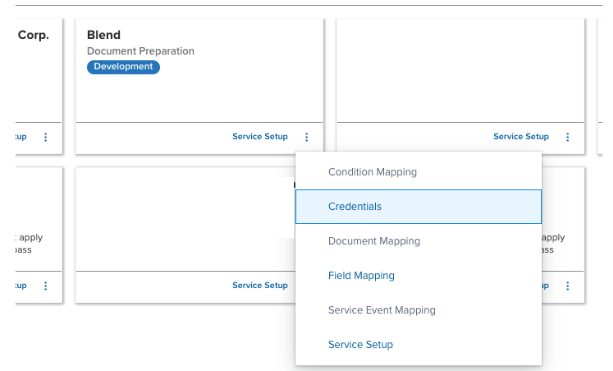
A Blend tile should be visible now from the “Services Management” page. On the Blend tile, click the vertical dot icon, and then click on “Credentials” from the menu that appears.

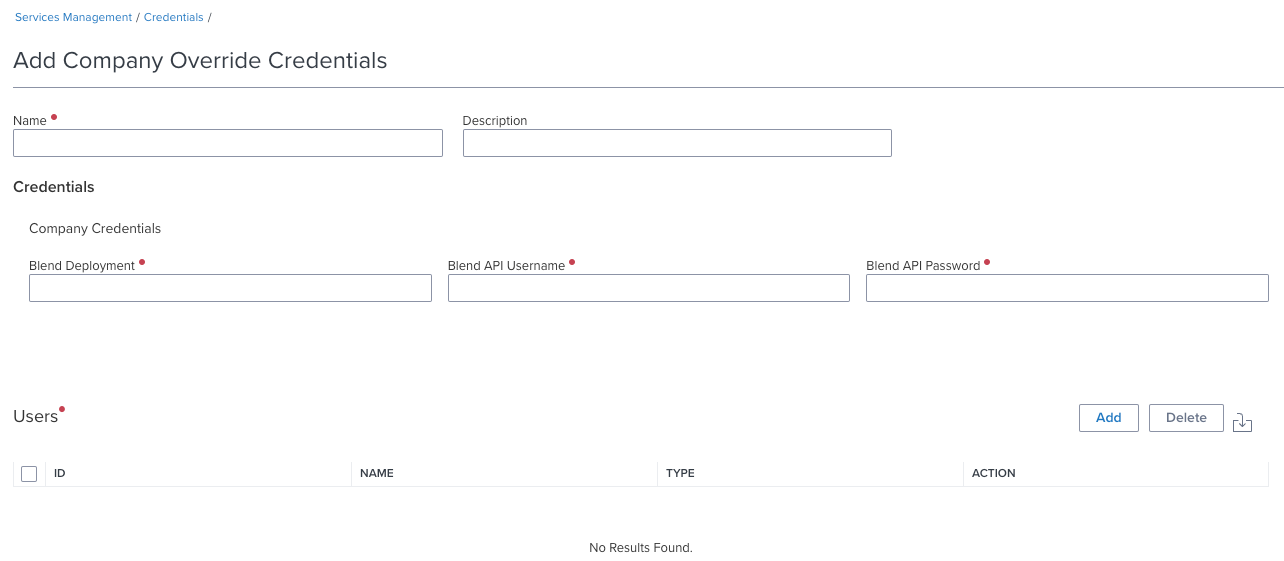
From the Blend Credentials page, select “Add.”

On the next page, fill in the following information:
- Credential name
- Blend Deployment
- This should correspond to the customer’s Blend tenant name
- Blend API Username
- This should have been received from Blend Support after they created the API credentials
- Blend API Password
- This should have been received from Blend Support after they created the API credentials
Additionally, add authorized users of this credential by using the Add button above the Users section.

After all fields are entered and users are added, click the Save button (bottom right of the page) to proceed.
Configure API Credentials - Multiple Tenants
For customers who have multiple Blend tenants, configuring API credentials will follow a similar process for single-tenants (as outlined in the section above) but with the following differences:
Blend Support may create multi-tenant API credentials, which are credentials that can grant access to multiple tenants, or provide single-tenant credentials for each tenant
In Encompass Partner Connect, admins will configure groups of users or branches that are tied to each tenant
If you are configuring API credentials for the first time and you have multiple Blend tenants, email Blend Support (support@blend.com) and request multi-tenant API credentials.
Once Blend provides the API credentials for each tenant, navigate to the “Service Management” page in Encompass and click on “Credentials” from the menu on the Blend tile.
From the Blend Credentials page, select “Add.”

On the next page, choose one of the tenant + credentials combination and fill in the following information (Note: These steps will need to be repeated for each tenant + credential):
Credential name
Blend Deployment
This should correspond to the customer’s Blend tenant name
Blend API Username
This should have been received from Blend Support after they created the API credentials
Blend API Password
This should have been received from Blend Support after they created the API credentials
Add authorized users of this credential by using the “Add” button above the Users section.
After all fields are entered and users are added, click the Save button (bottom right of the page).
Steps 1-6 will need to be repeated for each Blend tenant the customer has.
Post-Submission Loan Creation
A loan must exist in Blend before disclosures can be delivered. Blend’s Encompass integration will allow users to create a new follow-up loan in Blend from within the Encompass interface. By separating the loan creation from the disclosures workflow, users have the flexibility to request information from borrowers (e.g. eConsent) before delivering disclosures to them through Blend.
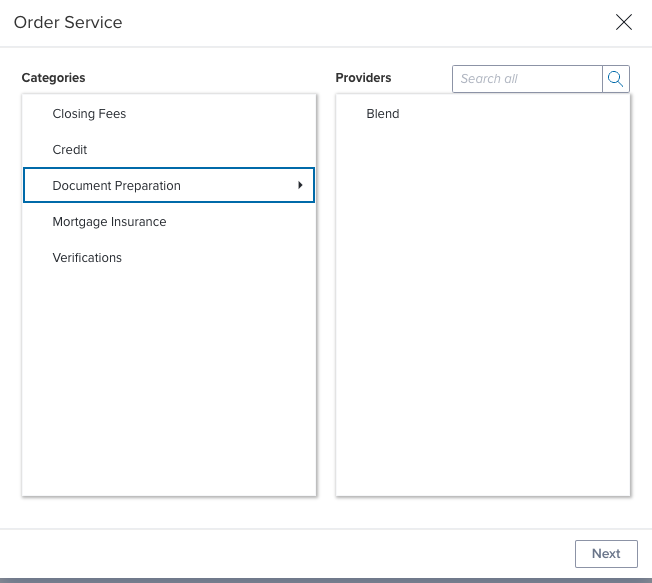
Users can begin the process of creating loans in Blend through the Services interface in the loan in Encompass. In your loan file, navigate to Services → All Services, and then click Order Services (button in the top right corner). On the modal that appears, choose “Document Preparation” from the Categories panel, and then “Blend” from Providers.
A Blend-generated interface should appear on the main window.

Clicking on the “Details” links on this page under Disclosures and eClose will show steps on how to send disclosures and closing packages to Blend, respectively. Users should follow those steps in order to send disclosures and closing packages.
To proceed with creating a loan in Blend, users should click the “Push Loan Information to Blend” button. In order for a loan to be created in Blend, the loan file must include the following fields:
Borrower name
Email address
Phone number
Date of Birth
Social security number
Loan purpose
Property type
Mortgage type
Loan amount
If the data for any of these fields are missing in the Encompass loan file, users will be prompted to provide the missing data before the loan will be created in Blend.

Once the missing information is added, users will click “Update Loan Information.” Any information that is added to these fields will be updated in the file in Encompass, and the loan file will be shared with Blend. If, however, all the data for the required fields are present by the time loan creation is attempted, the loan will be created in Blend without additional input required.
If the sync to Blend is successful, users will see the window update indicating that success.

Users can click the “Go to Blend” button from this page and be redirected to the loan in Blend (it will open in a new browser tab). The borrower will be invited to log in to Blend automatically, after the loan has been created in Blend.
Partner Document Delivery Walkthrough
To send disclosures to Blend from Encompass, users will need to access the eFolder from the Encompass loan file. The loan must have either been created in Blend and synced to Encompass or pushed to Blend using our EPC workflow in order to send disclosures, otherwise, you will receive an error. In Encompass Web, users can send disclosures by clicking on any of the following buttons within the eFolder: Disclosures, Request/Send, Pre-Closing, or Closing.

On the next page, users should change the “Delivery Method” to “Send to Blend.” Note: It is not possible at this time to configure a default Delivery Method in Encompass. Users going through this workflow will need to set this option every time.

Users can proceed through the disclosures workflow in Encompass as usual (reviewing the Loan Audit, adding or editing documents and templates, and reviewing signers). On the last page (“Signers”) users should click the “Send to Partner” button in the bottom right corner to complete the disclosures flow and send the package to Blend.

A Disclosure Tracking record is created by Encompass and will be in Pending status until Blend successfully confirms receipt of the package.
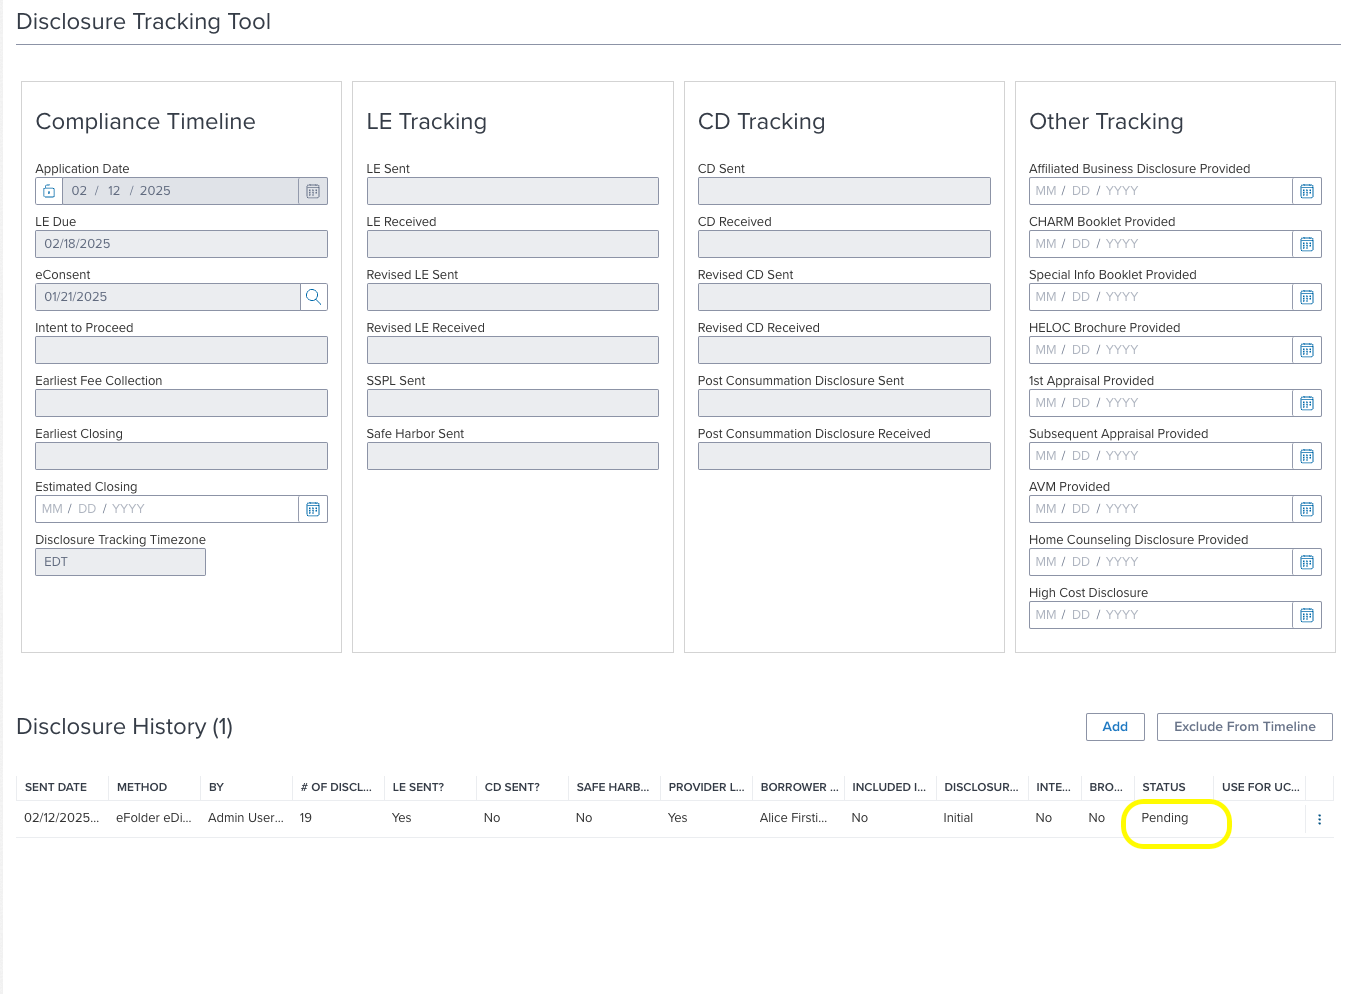
Once the package is confirmed in Blend, under Services - Document Preparation - Blend, a record will be created and the Partner Status will reflect “Created in Blend”

Additionally, selecting this record will open a modal showing more details about the transaction

The reference number will reflect the Blend package GUID and the info icon will reflect the Encompass transaction GUID. If the package is not successfully created in Blend, the Encompass transaction GUID can be provided to Blend for troubleshooting. Additionally, an error message will be displayed by hovering over the status icon for the transaction.
The Disclosure Tracking record will move to Active status once Blend confirms receipt of the package

Once the package is viewed and/or signed, the eDisclosure tracking tab of the disclosure tracking record will be updated
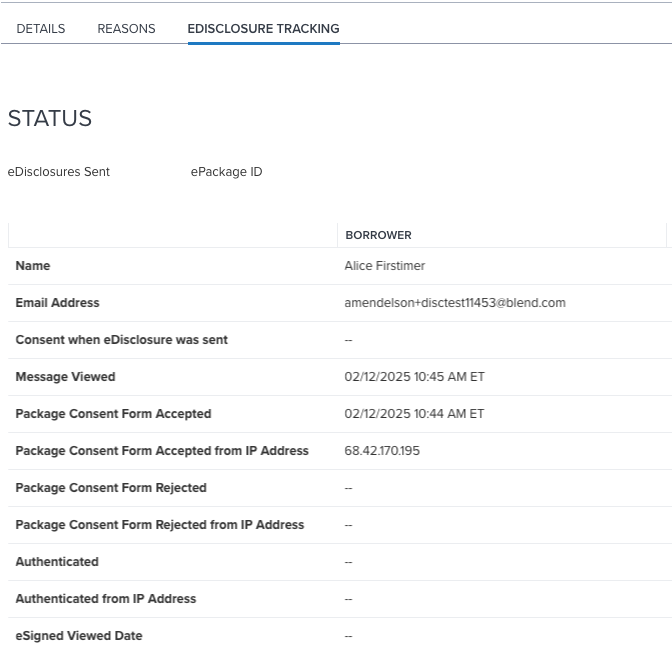
The Documents Sent list in the Disclosure Tracking record will contain the list of documents included in the package, however, it will not be possible to view the documents here. Instead, Blend creates an eFolder bucket for each unsigned package and places the unsigned documents in the eFolder. This is in addition to the signed documents being returned to the eFolder.


Disclosures packages delivered to Blend can also be tracked in the Disclosures & Closing tab of the lender application in Blend.

Partner Document Delivery and Request/Send Workflow
The request/send workflow allows for a user to send ad-hoc disclosures, eFolder documents, or a “needed” document to Blend. Ad-hoc disclosures and eFolder documents will be treated the same as any other disclosure package sent via Partner Document Delivery to Blend.
When sending a “needed” document, Blend will create a follow-up, asking the borrower for the requested document.
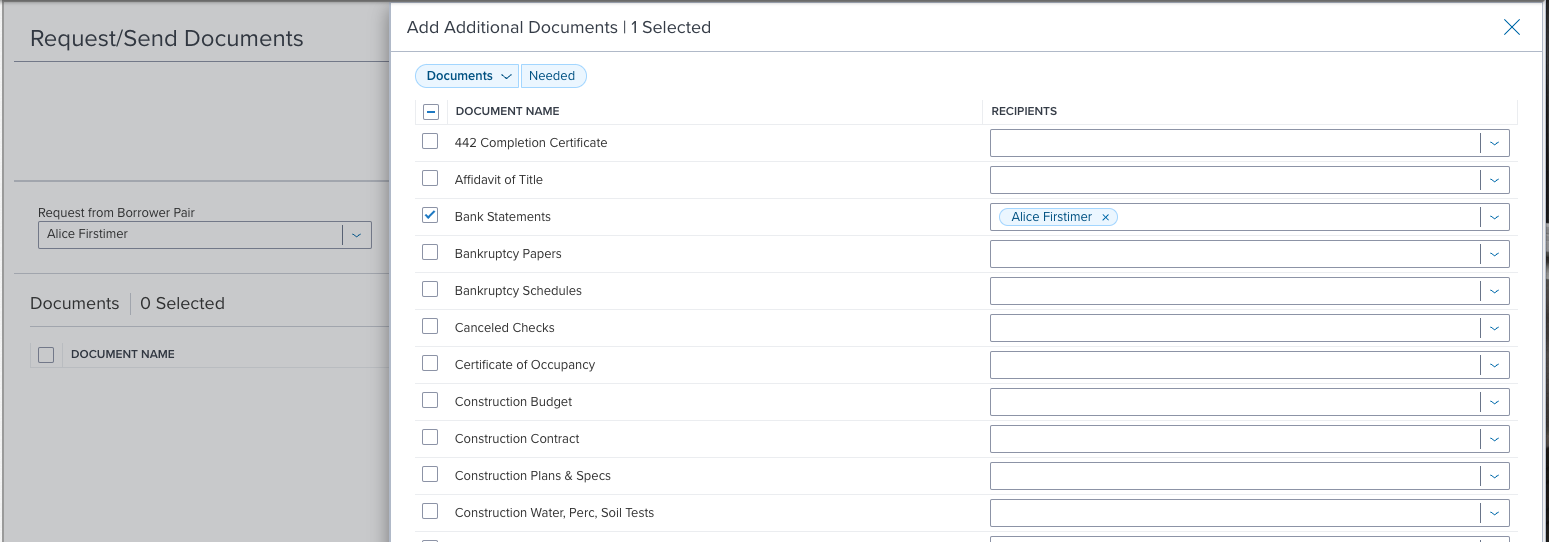
In order for the requested document to be returned back to the eFolder, a document mapping must be set up in Blend for the requested document type. Please contact your Blend representative if you need assistance with document mapping. If no document mapping is set up, the follow up document will be returned to the eFolder unassigned.
Once the request is sent to Blend, a follow up will appear in the borrower portal. Note: If the borrower hasn’t completed eConsent, they will be required to do it prior to signing.

Was this article helpful?
That’s Great!
Thank you for your feedback
Sorry! We couldn't be helpful
Thank you for your feedback
Feedback sent
We appreciate your effort and will try to fix the article